Eco Friendly Christmas Crafting

| on
05:00
Hello, and welcome to my blog!
You may have joined me from my beautiful friend Leonie and her gorgeous creations, 
or have started right here.
Today, there are a great bunch of Stampin' Up! Demonstrators from around the world, sharing with you our Eco Consious Christmas Crafting projects.
The main purpose is to be Plastic Free; recycle, upcycle, reuse and choose products that protect our environment.
#saynotosingleuse ♻

I foraged some bits and pieces on a beach track; taking the leaves from fallen branches 
and hoping for nature inspired Bush Christmas creations.

Gift tags with a difference.
Large leaves adhered to the cardstock with 'Tear & Tape Adhesive', 
and 'Mini Glue Dots' for the other foliage.

Make your own gusseted gift bags using Brown Paper sandwich bags! 
(My bag measures 26.5cm x 20cm or 10-1/2" x 8")
1. Trim 1cm or 6/8" from the bottom of the bag.
2. Score the bottom of the bag 5cm or 2"
3. Score both sides 4cm or 1-1/2"

4. Stamp an image over the front of the bag.
(I have used a Christmas tree from the 'Perfectly Plaid' stamp set)
5. Snip the score lines from the bottom of the bag, to the 2" score line.

6. Open the bag and fold in the sides.
7. Fold under the flaps and adhere.
*Tip: for a more sturdy bag, add cardstock to the bottom measuring 
11.5cm x 7cm or 4-1/2" x 2-3/4"

The ultimate Christmas treats in Copper lidded glass jars.
Wrapped with 'Braided Linen Trim' and a Christmas Tree from the 'Pine Tree Punch'.
*The soft plastic packaging from the treats can be taken to REDcycle - 
'keeping plastic bags and soft plastic packaging out of landfill'.

Triple Chocolate Chip Cookies
Some cute packaging of these cookies in a preserving jar.
Decorated on the lid; some embossed cardstock, and a lovely wrap of 'Magnolia Lane Ribbon' and the tag attached with the 'Mossy Meadow Linen Thread'.


I love the nature inspired look of my Christmas Crafting, and I hope to have inspired you to create some amazing projects yourself.

Below are the Eco Conscious Crafting Design Team, and they are awesome!
Have a wonderful time visiting their blogs, and see you next time. D x
Anna 
Eva 
Denita - you are here!

Below are all the products used for my 'Eco Friendly Christmas Crafting' creations. 
 Click on a thumbnail to be taken to my Online Store for all the products I have used, and there is also the Clearance Rack full of discounted items.
 You can also browse the Stampin' Up! 2019-2020 Annual Catalogue - it's awesome! 
 And the 2019 Holiday Catalogue is here! 
Have fun shopping. 
 *Australian Residents only. 
Product List:
Paper Snips
[103579]
$17.00

Just Add Ink - Just Add a One Layer Card Challenge #485

| on
00:00

This week, the Just Add Ink Design Team have created a 'One Layer card'.
And, we have all had a little bit of a struggle to create with just one layer! However, you are going to be pleasantly surprised with what we have come up with.
We would love to see your One Layer creations, and you can add your project to the Just Add Ink Gallery, here.


I have created a Wedding card for our friends getting married this weekend.
I received the NEW 'Forever Blossoms' stamp set as a Prize Patrol, when I attended OnStage Sydney recently, and I couldn't wait to make my 'One Layer card'.

I stamped the flourish, using Memento Ink, directly to the 'Shimmery White' cardstock.
I stamped the sentiment using 'Jet Black Stazon ink' - it stands out from the flowers and leaves.
Lastly, I added the flower and leaves using the Masking Technique.

I coloured the stamped images using 'Stampin' Blends Markers'.
'Light Crumb Cake' was used to outline the images, giving a sense of depth, and it looks like the flowers and leaves are popping from the card front.

I stamped another sentiment on the inside of the card.
As you can see, the 'Stampin' Blends Markers' have come through the cardstock from the colouring on the front of the card. I won't cover it up, as it's showing my handmade work.
However, if you need to cover the inside of your card, you can.

A clean and simply, lovely Wedding card.

Thankyou so much for paying me a visit. Make sure you visit the Design Team via their blogs, and be wowed by our 'One Layer Cards'.
See you next time. D x


Below are all the products used for my 'JAI #485' creation. 
 Click on a thumbnail to be taken to my Online Store for all the products I have used, and there is also the Clearance Rack full of discounted items.
 You can also browse the Stampin' Up! 2019-2020 Annual Catalogue - it's awesome! 
 And the 2019 Holiday Catalogue is here! 
Have fun shopping. 
 *Australian Residents only. 
Product List:

'Put a Ring on It' - Creation Station Design Team Blog Hop

| on
01:00
Hello, and welcome to my blog.
You may have hopped from Sara's blog and her delightful creations?, 
or have started with me in Australia.
The Creation Station Design Team Blog Hop is all about 'Belly Bands'. 
A 'Belly Band' is a wrap of Cardstock, Designer Series Paper or Ribbon around a box, a stack of cards, or whatever you desire.


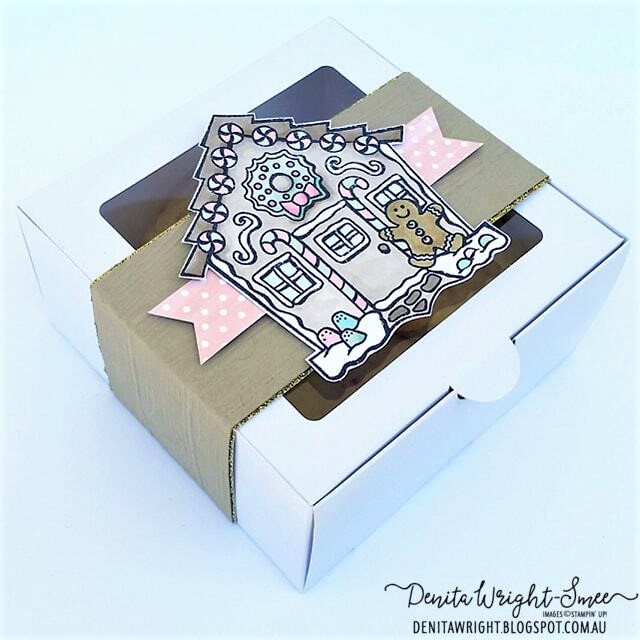
I have wrapped a belly band around a 'Baker's Box' filled with Shortbread treats, 
and a Gift Card Holder ready for Christmas.

Using non-traditional Christmas colours, I started out with the Gingerbread House from the 'Yummy Christmas' stamp set.

Firstly, I embossed the 'Crumb Cake Belly Band' using the 
'Pinewood Planks Embossing Folder. 
Secondly, adhering the 'Gold Glimmer Paper' behind the 'Belly Band', then wrapping the 'Belly Band' from the back of the 'Baker's Box' to the front. 
Add 'Stampin' Dimensionals' to the back of the Gingerbread House and adhere to the 'Baker's Box'.
*Tip: If there is a gap at the front of the box from the 'Belly Band', adhere a smaller piece of cardstock to bring the 'Belly Band' together. Adhere the Gingerbread House over the gap.

I have used 'Stampin' Blends Markers' with soft colours of Flirty Flamingo, Pool Party, 
Soft Sea Foam, Crumb Cake & Soft Suede.

I have used a strip of 'Bird Ballad DSP' for the banner.

A simple little Gift Card Holder, or a small envelope for a notecard, stamped with a sentiment from the 'Itty Bitty Christmas' stamp set.

The 'Belly Band' slips to the side, ready to open the envelope.

The 'Belly Band' is created the same way as the one for the 'Baker's Box' without the 'Gold Glimmer Paper'.
However, you can always add the 'Gold Glimmer Paper' to your project.


Thankyou for visiting my blog, and enjoy what the Design Team have in store for you...
Next up is the talented and gorgeous, Dena.
Click on the 'Next Up' button below to be taken to Dena's blog and her always amazing creations.


Thankyou for visiting my blog, and I'll see you next time. D x

Below are all the products used for my 'Girl Power Creation Station' creation. 
 Click on a thumbnail to be taken to my Online Store for all the products I have used, and there is also the Clearance Rack full of discounted items.
 You can also browse the Stampin' Up! 2019-2020 Annual Catalogue - it's awesome! 
 And the 2019 Holiday Catalogue is here! 
Have fun shopping. 
 *Australian Residents only. 
Product List:

Custom Post Signature

Custom Post  Signature