Butterfly Basics - Case the Designer Challenge #gdp024

| on
23:25
This week I have CASEd one of my favourite Stampin' Up! Demonstrators; Michelle Last.
The Global Design Project #gdp024 have a 'Case the Designer Challenge' and here is Michelle's gorgeous card that we are CASEing - aka 'Copy and Selectively Edit!' 
I have CASEd Michelle's creation by using the same layout, the butterfly feature and the beautiful 'English Garden Designer Series Paper' - although I have used the opposite side of the DSP... and every flower on the DSP has been outlined and touched with a 
'Clear Wink of Stella Glitter Brush'. 
(Imagine Tinkerbell giving a little wave of her wand and dusting the flowers with her sparkliest sparkles. So pretty!)
As you can see, there are similarities, however I have made this creation my own from the different elements and embellishments that I have used.
 My Butterfly is made from 'Kraft Corrugated Paper', 'Vellum Cardstock' and a stamped butterfly from the 'Butterfly Basics' Stamp set. The wooden heart is from the 'Love Blossoms Embellishment Kit and the 'Linen Thread' makes a lovely antennae.
Even the inside of the card has a touch of lovely, using some left over cardstock and a strip of DSP. This is such a great way to use up your offcuts and scraps. 
Because we always need some glitter and sparkle, there is some 'Wink of Stella Glitter' on the flowers inside as well. 

Oh, and a little bit of news from the last GDP Challenge...
Last week I was one of 4 Winners for the 
Plus, there were 125 fabulous entries which was a record of a-ma-zing entries for GDP. I was so happy I was even dancing on the inside! 

Don't forget that you can join in and play along as well. Click here for the GDP Schedule and make sure you Subscribe to follow by email:

Thankyou so much for taking the time to visit my blog. I loved this Challenge - in fact I love them all!!! I'll be back for next week. See you then. D x

Below are all the products used for my 'Butterfly Basics' creation. Click on a thumbnail to be taken to my Online Store. While you are there you can check out the NEW Occasions Catalogue, Weekly Deals and the Clearance Rack. And if you spend AUD$90 you earn a FREE Sale-a-Bration Product. Have fun shopping. 

*Australian Residents Only

Happy Easter Honeycomb Happiness Photo Tutorial

| on
14:30
Easter is not that far away, and I have made a start with this little 'Happy Easter' notecard using the Sale-a-Bration 'Honeycomb Happiness' Stampset. By purchasing $90 worth of Stampin' Up! products you could earn this Stampset for FREE!
Click on the photo below for more information:
http://www3.stampinup.com/ECWeb/ItemList.aspx?categoryid=120600

How cute is the little chick? This notecard is so easy to create, you won't believe it! Keep scrolling for my 'How to'.
There are a few products to gather before creating this notecard, and I have a list at the bottom of this blog post for you.

Step 1: Place the stamp face up on your grid paper. Place a Clear Block on top of the stamp. Using the 'Daffodil Delight Stampin' Write Marker' trace the outline of the chick onto the Clear Block.
Step 2: Colour within the traced outline using the 'Daffodil Delight Stampin' Write Marker'.
Step 3: Using the 'Stampin' Spritzer', lightly spritz the Clear Block with water.
Step 4: Turn the block over and stamp the spritzed image onto 'Watercolour Paper'. Be sure to press down and hold the block to the paper so the paper can absorb the ink.
Put aside to dry. If you need a quick-dry solution, use the Heat Tool to speed up the drying process.
Step 5: Ink up the chick using the 'Basic Black Archival Ink Pad', and stamp image onto the acetate sheet using the 'Stamp-a-Ma-Jig'.
Step 6: Make sure your 'Watercolour Paper' is totally dry - using the 'Stamp-a-Ma-Jig' line up the stamped image of the chick over the top of the 'Daffodil Delight' image. Remove the acetate, and stamp the chick onto the 'Watercolour Paper. Ta-da!
 My 6 year old told me I went out of the lines! Oops-a-daisy, but I did that on purpose.

Finish your little chick by colouring his feet & beak with 'Pumpkin Pie Stampin' Write Marker'. And decorate your notecard as you like.

Thankyou for visiting my blog. I hope you get to make your very own Happy Easter chick - and don't forget you can only get the 'Honeycomb Happiness' Stamp set FREE as part of Sale-a-Bration (pg 15 in the brochure) when you spend $90.
Have a happy day. D x

Below are all the products used for my 'Happy Easter Honeycomb Happiness' creation. Click on a thumbnail to be taken to my Online Store. While you are there you can check out the NEW Occasions Catalogue, Weekly Deals and the Clearance Rack. Have fun shopping. 
*Australian Residents Only


Balloon Celebration - Global Design Project Theme Challenge #gdp023

| on
21:12
Have you noticed how popular balloons are at the moment? They are everywhere! The Stampin' Up! Occasions Catalogue 2016, is the best place to start for all your Balloon making projects. From stamps, to coordinating punches and the dreamiest Designer Series Paper - there is something for everyone and something to create for every occasion. 
The Global Design Project #gdp023 have a 'Theme Challenge' this week, and I bet you won't be able to guess what the 'Theme' is? Drumroll...

Tada! And here is my 'Balloon Theme' creation for this week;
I have used 'Vellum Cardstock' for the balloons which I stamped, heat embossed using White Embossing Powder & Dazzling Diamonds Glitter - and punched out my balloons using the 'Balloon Celebrate' Bundle.
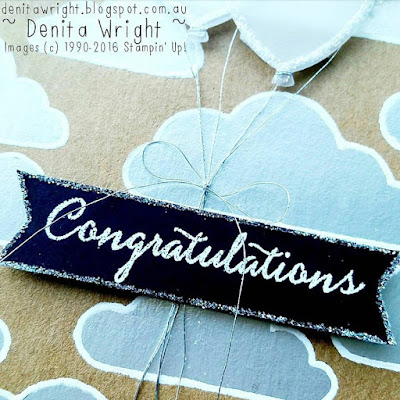
I instantly thought of the clouds from the 'Shine On Specialty' Designer Series Paper. (Divine) I knew the DSP would be a perfect background for my Vellum Balloons. If you look closely, I have outlined all of the clouds using the White Signo Uni-Ball gel pen. It's as good as colouring in! Fiddly, but I am really happy with the outcome.
Another close up of the embossed balloons (I wish you could capture the 'bling' from the Dazzling Diamonds Glitter). The Whisper White Thick Cardstock, Kraft & Silver are a beautiful combination for an Engagement or Wedding. By changing the sentiment - this creation could be for any occasion.
I edged the sentiment using the Fine Tip Glue Pen dipping the edges into the Dazzling Diamonds Glitter. The Silver Metallic Thread was used for tying the strings to the balloons, and the tiny bow to tie the strings together.

Thankyou for visiting my blog. I love it when you do. Feel free to leave me a comment. I love them. D x

Below are all the products used for my 'Balloon Celebration' creation. Click on a thumbnail to be taken to my Online Store. While you are there you can check out the NEW Occasions Catalogue, Weekly Deals and the Clearance Rack. Have fun shopping. 
*Australian Residents Only

'Dear Friend' Gift Tags

| on
23:55
Hello, and welcome to the start of the week.
I needed to make some gift tags, and these are what came to mind once I grabbed my 'Ornate Tag Topper Punch' & 'Birthday Blooms' Stamp set (love the font!) and gathered my 'Crumb Cake' & 'Very Vanilla' cardstock. Love Neutrals.
The 'Rose Garden Thinlits Dies' are spectacular, however for my tags I used the sweet and small flower. I also used the sentiment banner, but in a different way.

I turned the banner die upside down onto the Very Vanilla cardstock, so the cutting side of the die is facing upwards. Placing the Cutting Pad on top, I then churned it through the Big Shot.
I used a 'Basic Black Stampin' Write Marker' to outline the inside of the die whilst still in place on the cardstock, then handcut the impression of the die on the outside.
I hand drew the black lines around the edges of the tags before finishing with the yummy 'Very Vanilla Thick Bakers' Twine'. Voila!

Hope you like my tags? I know I do. D x


Below are all the products used for my 'Dear Friend' tags. Click on a thumbnail to be taken to my Online Store. While you are there you can check out the NEW Occasions Catalogue, Weekly Deals and the Clearance Rack. Have fun shopping. 

*Australian Residents Only
Built for Free Using: My Stampin Blog

No Bones About It - Global Design Project Sketch Challenge #gdp022

| on
13:18
Hello again. This is my third blog post this week! There has been lots of creating happening around here.
The Global Design Project have a Sketch Challenge #gdp022 for us this week and already the GDP Design Team have created some beautiful projects. So, without hesitation here is this weeks Sketch:
http://www.global-design-project.com/2016/02/global-design-project-022-sketch.html
I am making 3 Birthday cards for 7 year old boys this week, and my youngest has chosen 'No Bones About It' for his 3 little mates. The Sketch is a perfect layout for what I had in mind...
The Stegosaurus card is set out just like the sketch. I managed to snip part of his tail, then used a Circles Collection Framelit to die cut around him. The Cucumber Crush circle is punched using the 2 1/2" Circle Punch.
The Triceratops is sitting on the opposite side of the sketch. Again, snipping his tail and using a Framelit to cut him out. 
And last but not least, the Tyrannosaurus Rex is happy sitting Landscape.

Have you seen the 'Shine On Specialty Designer Series Paper'? It is so much better in real life and it's beautiful to work with. Gorgeous Kraft paper and coordinating colours: Bermuda Bay, Cucumber Crush, Watermelon Wonder & Silver.
As usual, I took a deep breath in before cutting this beautiful paper. And all I needed was a tiny piece to make some impact.

Thankyou for visiting my blog and I hope you have enjoyed my 'No Bones About It' creations? They were fun to make and easy to get cracking and make a few at once. 
'Have a dino-rrific day!' D x


Below are all the products used for my 'No Bones About It' creations. Click on a thumbnail to be taken to my Online Store. While you are there you can check out the NEW Occasions Catalogue, Weekly Deals and the Clearance Rack. Have fun shopping. 
*Australian Residents Only

Built for Free Using: My Stampin Blog

Love Blossoms Gift Card Holder Photo Tutorial

| on
19:35

Hello, and welcome to my blog.
As promised I have a photo tutorial for the 'Love Blossoms Gift Card Holders' I created for the February Creation Station Blog Hop.
The Gift Card Holders are very simple to make, and a lovely way to use the 6"x6" 'Love Blossoms Designer Series Paper Stack' (or any other DSP you may have hiding away)

I used the Stampin' Trimmer with the Scoring Blade to score the Designer Series Paper. You can also use the Simply Scored.

Here is a little bit of help for those requiring Imperial to Metric conversion, or click here for a conversion chart.

                   
 Step 1: Trim 1cm from the bottom of the 6"x6" DSP. Either discard, or keep this piece for decorating your Gift Card Holder. Score the bottom at 8mm - a perfect width for Tear & Tape Adhesive.
Step 2: Turn DSP so the 6" piece is along the top of the Trimmer. Score 8mm & 8cm.
Step 3: Trim the bottom of the DSP along the score line as shown. Don't forget to notch the tab. 
Step 4: Place Tear & Tape adhesive onto the 8mm scored edge, and bottom tab as shown.
Step 5: Remove backing from the Tear & Tape adhesive and fold over the scored edge, keeping the flap tucked in. 
Step 6: Remove backing from the Tear & Tape adhesive on the bottom tab and fold to adhere to the back of the Gift Card Holder.
Step 7: Punch a semi circle using the 1" Circle Punch at the top (open) end of the Gift Card Holder.
Step 8: Cardstock dimensions for the insert - 13cm x 7cm (5 1/8" x 2 3/4"), using Whisper White cardstock.

I decorated my Gift Card Holders with different elements that coordinated with the Love Blossoms DSP. 
Colours: Blushing Bride, Crumb Cake, Rose Red & Whisper White. One of my favourites is the Blushing Bride Glimmer Paper - so pretty, and sparkly and just divine!!!

I hope you make your very own Gift Card Holders from my photo tutorial. Again, you can use any 6"x6" DSP and I would love to see your creations! Please ask any questions, and I love a comment too.
Happy creating. D x

Below are all the products used for my 'Love Blossons Gift Card Holder Tutorial'. Click on a thumbnail to be taken to my Online Store. While you are there you can check out the NEW Occasions Catalogue, Weekly Deals and the Clearance Rack. Have fun shopping. 
*Australian Residents Only
Built for Free Using: My Stampin Blog


Creation Station Blog Hop 'Bloomin' Love'

| on
01:00
Hello and welcome to the February Creation Station Blog Hop! You may have started with me?, or have hopped on over from Julie, or back from Jen. Just make sure you hop all around to visit the other fabulous Design Team Members. 
(The links are at the bottom of my blog post). 
And we have a brand new logo! Isn't is divine? Thanks to Cindy, Jen & Dena for their combined effort. Love it!


This month we are celebrating all things 'LOVE' and I have used the 'Bloomin' Love' Bundle and the 'Love Blossoms' Suite to make my LOVE creations for Valentines Day. But, this lovely lot is so versatile - think Weddings/Engagements/Anniversaries... and the Blushing Bride Glimmer Paper is the prettiest and sparkliest - it is a MUST for your stash!
I have made some sweet notecards in Blushing Bride, Rose Red & Whisper White. The Bloomin' Hearts Thinlits Die is the most beautiful die, and I wanted to leave it quite simple to showcase the intricate details. I added the die cut flowers and some Blushing Bride Glimmer Paper to the centre of the flowers.
Inside... I used Stampin' Write Markers to colour the Banner and Sentiment, and tiny strips of Love Blossoms DSP Stack & Blushing Bride Glimmer to finish.
My Rose Red version, and some Basic Pearls added to the centre of the flowers for a pretty, vintage feel. I love the simple matting of the Blushing Bride & Rose Red cardstock too. 
A very simple bannered sentiment for the inside of my Rose Red notecard.
These are Gift Card Holders using the Love Blossoms Designer Series Paper Stack - I am loving the combination of Blushing Bride & Crumb Cake! There are 48 sheets of this beautiful patterned 2 sided paper measuring 6"x6", and these holders are so easy to make. And not forgetting the Glimmer Paper. Swoon...
(I hope to have a photo tutorial for the Gift Card Holders for you soon - so make sure you are Subscribed to my blog so you can receive email updates and you don't miss out.)

I loved the way the Blushing Bride Glimmer heart turned out. It had to be in a frame, lifted by Stampin' Dimensionals and nothing else.
...it's in the air
I changed up the colour palette and used my favourite colours; Pool Party & Crumb Cake with some Dazzling Diamonds Glimmer Paper for the required bling! I love how these notecards turned out.
A close up of the intricate details and the gorgeous Dazzling Diamonds Glimmer Paper. So dazzling!

NEWSFLASH!!! There is a brand new product in the Occasions Catalogue called the Big Shot Die Brush. It is the best thing ever, and it helps remove the paper from intricate dies without tearing the paper. See photos below:
  
Click on the video below to see the 'Bloomin' Hearts Thinlits Dies' Youtube tutorial by Stampin' Up!

Thankyou for joining me on the blog hop and don't forget to keep on hopping. I can't wait to see what the other girls have created, and all you need to do is click NEXT or BACK. 
I would love for you to leave me a comment and leave a comment for the Design Team Members. We love them! D x

*A big THANKYOU shoutout to my gorgeous Upline, Karen. If it wasn't for Karen, I would not be here! A few weeks ago I went to Karen's where I borrowed her products for my blog hop. I didn't have the Bloomin' Love Bundle, and I wanted to get cracking for this blog post. I am so lucky to have a wonderful and supportive Upline. That's what Stampin' Up! is all about.

                                                  
                                 to visit Julie...                                                    to visit Jen...
                                                                              
Below are all the products used for my 'Bloomin' Love' creations. Click on a thumbnail to be taken to my Online Store. While you are there you can check out the NEW Occasions Catalogue, Weekly Deals and the Clearance Rack. Have fun shopping. 
*Australian Residents Only
Built for Free Using: My Stampin Blog

Custom Post Signature

Custom Post  Signature